In this article, You will learn everything about add a new column in an existing table in MySQL with the help of the MySQL client and workbench.
As a developer, I have faced this issue multiple times. Most of the time my requirement was to add a new column in the existing table as per the requirement of the projects. At that time, I used to use this MySQL statement to add a new column in MySQL which I am about to tell you about throughout this article.
Here, We will see a total of two ways to add a new column in an existing table in MySQL step by step. The First will be using MySQL client and the second will be Using the Workbench application.
Let see.
To add a new column in the MySQL table, We will use the ALTER TABLE ADD COLUMN statement which is as follows.
ALTER TABLE table_name ADD [COLUMN] column_name column_definition [ FIRST| AFTER existing_column ];Let’s understand the above syntax in more detail so that you can be aware more of it.
- First, you have to specify the name of the table after ALTER TABLE statement.
- Second, You have to specify the name of the new column along with its definition just after the ADD statement. You need to remember one thing here, Here COLUMN is the optional keyword, that’s why you can omit it if you want. If you do not specify anything it will create a new column at the end of all the columns.
- Third, MySQL allows us to add a new column as the first column of the table by using the FIRST keyword otherwise a add new column just after any existing column just by specifying the AFTER existing_column.
To add multiple columns in MySQL, you have to specify all the new columns along with their definition separated by a comma (, ). Which as follow.
ALTER TABLE table_name
ADD [COLUMN] column_name column_definition [FIRST|AFTER existing_column],
ADD [COLUMN] column_name column_definition [FIRST|AFTER existing_column],
ADD [COLUMN] column_name column_definition [FIRST|AFTER existing_column],
..
..
..
ADD [COLUMN] column_name column_definition [FIRST|AFTER existing_column];
Now it’s time to come to implement the above syntax by examples.
To add a new column in an existing table in MySQL, first I will create a table called student using CREATE TABLE statement.
CREATE TABLE student (
  roll_no int NOT NULL AUTO_INCREMENT,
  first_name varchar(50) DEFAULT NULL,
  last_name varchar(50) DEFAULT NULL,
  PRIMARY KEY (roll_no)
)
After, executing the above statement, your table will be created successfully.
To check whether the table is created or not, use the DESC keyword which is as follows.
mysql> DESC student;
+------------+-------------+------+-----+---------+----------------+
| Field      | Type        | Null | Key | Default | Extra          |
+------------+-------------+------+-----+---------+----------------+
| roll_no    | int         | NO   | PRI | NULL    | auto_increment |
| first_name | varchar(50) | YES  |     | NULL    |                |
| last_name  | varchar(50) | YES  |     | NULL    |                |
+------------+-------------+------+-----+---------+----------------+
3 rows in set (0.20 sec)
If you are able to see the above output it means our table is created successfully.
Now, I am going to insert some records into this table by using the INSERT INTO statement.
INSERT INTO student
VALUES
(1, 'Vishvajit', 'Rao'),
(2, 'Jainy', 'Doe'),
(3, 'Vaishali', 'Singh'),
(4, 'Harshita', 'Kumari'),
(5, 'Vishal', 'Rao'),
(6, 'Karandeep', 'Singh'),
(7, 'Vishvajit', 'Rao'),
(8, 'Pankaj', 'Sharma');
To check whether records are inserted or not, use the SELECT statement.
mysql> select * from student;
+---------+------------+-----------+
| roll_no | first_name | last_name |
+---------+------------+-----------+
|       1 | Vishvajit  | Rao       |
|       2 | Jainy      | Doe       |
|       3 | Vaishali   | Singh     |
|       4 | Harshita   | Kumari    |
|       5 | Vishal     | Rao       |
|       6 | Karandeep  | Singh     |
|       7 | Vishvajit  | Rao       |
|       8 | Pankaj     | Sharma    |
+---------+------------+-----------+
8 rows in set (0.00 sec)
Now, we will add a new column in the existing table in MySQL.
Suppose after some time, Our requirement is to add a new column called date_of_adimmision with the DATE data type.
Headings of Contents
Add a new Column in the Existing Table in MySQL using MySQL Client
Here we will add a new column in the student table in different-2 ways like with default value, after a column, end of the columns, with Null values, etc.
Now, Let’s add a column called date_of_admission of the student with the DATE data type.
Example: Add column in MySQL with default value null
ALTER TABLE student
ADD COLUMN
date_of_admission DATE NULL;
After executing the above statement, A new column date_of_admission will create. To check, use DESC table_name statement as follows.
mysql> DESC student;
+-------------------+-------------+------+-----+---------+----------------+
| Field             | Type        | Null | Key | Default | Extra          |
+-------------------+-------------+------+-----+---------+----------------+
| roll_no           | int         | NO   | PRI | NULL    | auto_increment |
| first_name        | varchar(50) | YES  |     | NULL    |                |
| last_name         | varchar(50) | YES  |     | NULL    |                |
| date_of_admission | date        | YES  |     | NULL    |                |
+-------------------+-------------+------+-----+---------+----------------+
4 rows in set (0.00 sec)
As you can see in the above example, A new column date_of_adimmision has been created with DATE TYPE.
Example: MySQL adds a column with a default value
Suppose we want to create a new column along with the default value. For example, I want to create a new column college with the default value ‘ABC Group of College‘ because all the students belong to the same college.
ALTER TABLE student
ADD COLUMN
college VARCHAR(50) DEFAULT 'ABC Group of College';
let’s check new column college is created or not.
mysql> select * from student;
+---------+------------+-----------+----------------------+
| roll_no | first_name | last_name | college              |
+---------+------------+-----------+----------------------+
|       1 | Vishvajit  | Rao       | ABC Group of College |
|       2 | Jainy      | Doe       | ABC Group of College |
|       3 | Vaishali   | Singh     | ABC Group of College |
|       4 | Harshita   | Kumari    | ABC Group of College |
|       5 | Vishal     | Rao       | ABC Group of College |
|       6 | Karandeep  | Singh     | ABC Group of College |
|       7 | Vishvajit  | Rao       | ABC Group of College |
|       8 | Pankaj     | Sharma    | ABC Group of College |
+---------+------------+-----------+----------------------+
8 rows in set (0.00 sec)
As you can see the new column college has been created along with the default value ‘ABC Group of College‘.
Example: Add a column after another column in MySQL
To add a column after another column, use the AFTER exsting_column statement as follows. Here, I am going to add a new column called age just after the last_name column.
Table structure before adding the new column:
mysql> desc student;
+------------+-------------+------+-----+----------------------+----------------+
| Field      | Type        | Null | Key | Default              | Extra          |
+------------+-------------+------+-----+----------------------+----------------+
| roll_no    | int         | NO   | PRI | NULL                 | auto_increment |
| first_name | varchar(50) | YES  |     | NULL                 |                |
| last_name  | varchar(50) | YES  |     | NULL                 |                |
| college    | varchar(50) | YES  |     | ABC Group of College |                |
+------------+-------------+------+-----+----------------------+----------------+
4 rows in set (0.00 sec)
Adding new column age:
ALTER TABLE student
ADD COLUMN
age INT NULL AFTER last_name;
Table structure after adding the new column.
mysql> desc student;
+------------+-------------+------+-----+----------------------+----------------+
| Field      | Type        | Null | Key | Default              | Extra          |
+------------+-------------+------+-----+----------------------+----------------+
| roll_no    | int         | NO   | PRI | NULL                 | auto_increment |
| first_name | varchar(50) | YES  |     | NULL                 |                |
| last_name  | varchar(50) | YES  |     | NULL                 |                |
| age        | int         | YES  |     | NULL                 |                |
| college    | varchar(50) | YES  |     | ABC Group of College |                |
+------------+-------------+------+-----+----------------------+----------------+
5 rows in set (0.00 sec)
As you can see in the above example, How we have successfully added a new column age just after the last_name column.
So far we have seen how we can use the MySQL Client tool to add a new column in an existing table in MySQL but apart from that, we are about to see how to add a new column using MySQL Workbench also.
How to add a new column in MySQL in Workbench?
Let’s see a brief about MySQL workbench.
MySQL Workbench:- MySQL Workbench is an official GUI ( Graphical User Interface ) application for MySQL. It allows us to design, create and browse the database schema, work with database objects, insert data as well as design and run SQL queries.
Please follow all the given steps to add a new column in MySQL using Workbench:
- First, You have to login into MySQL Workbench by using your credentials like username, password, database, etc.
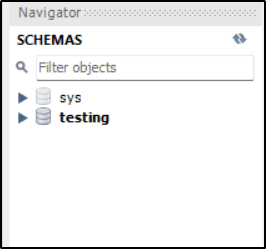
- Once you have successfully logged in to the workbench, you will see all your database in the left panel. As you can see.
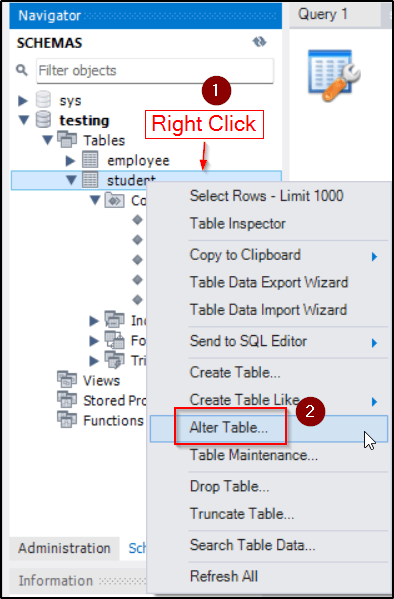
- Expand the database, Right-click on the table name, and click on Alter Table option.
- To add the new column, double-click on the blank space down and provide your new column name along with its data type, and after that click on Apply.
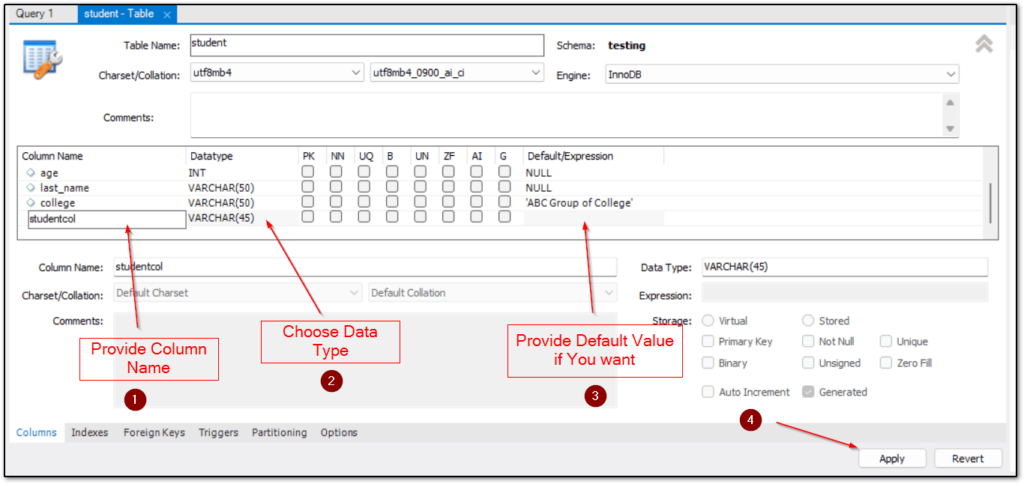
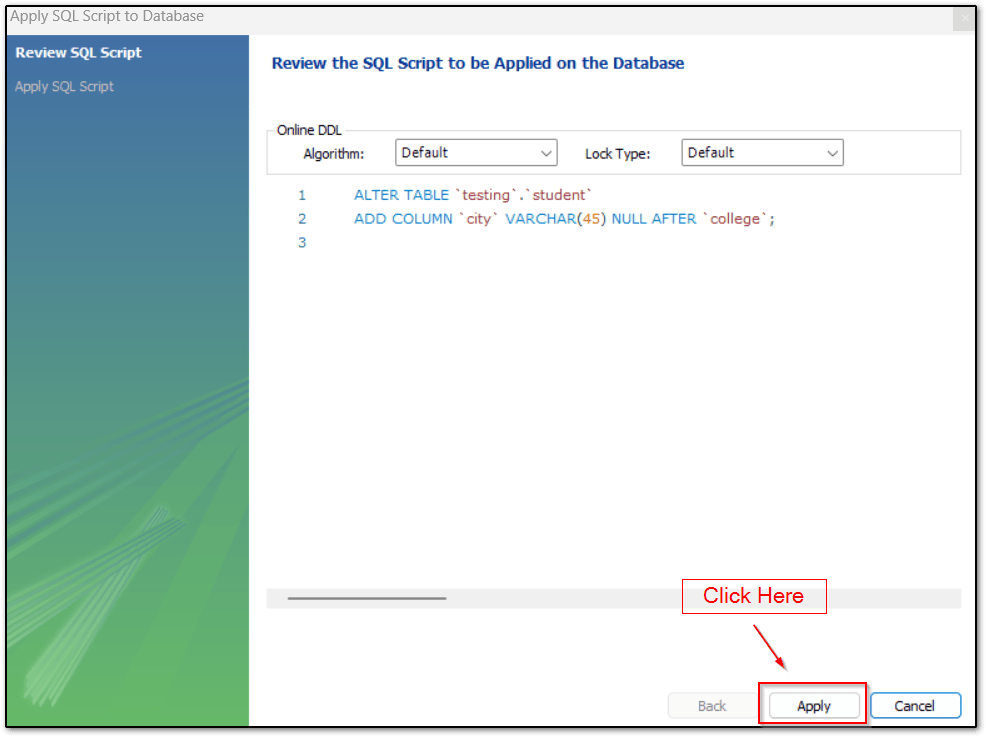
- Now a new window will appear where the SQL query will appear. That SQL statement will contain the ALTER TABLE statement with the new column names you want to add and after that click on the Apply button.
- Click on Finish.
So, this is how you can use the MySQL Workbench tool to add a new column in an existing table in MySQL.
👉 MySQL ALTER TABLE Statement Ref:- Click Here
Summary
So, I think, After this article, you would have known everything about how to add a new column in an existing table in MySQL using MySQL client tool and MySQL workbench application but I will highly recommend you always go with raw SQL statements to add any new column because as a developer or as a Database Administrator you should have knowledge of SQL queries.
I hope you found this article very helpful, Please share it with someone who wants to learn more about MySQL.
Thanks for your valuable time…. 🙏🙏🧑💻🧑💻