Hello, everybody, I hope you guys are doing well. In this article, you will see everything about how to show columns of a table in MySQL.Here we will show various ways to show all the columns and their data types of any particular database table. Believe me, guys, after reading this article, You will be completely able to show columns of tables in MySQL.
Sometimes we want to see which column is using what kind of data type, At that time all these commands will be very useful.
MySQL offers various ways to display columns of tables. Now, let’s explore all those ways to show columns of a table in MySQL database. Throughout this article, I will use a table called employee. I have created this employee table for demonstration.
Headings of Contents
Using DESCRIBE Command
DESCRIBE is one of the most common and frequently used commands provided by MySQL. By default, it displays all the column information in the table. it can also capable of display information about a particular column. To show the single-column information you need to just pass the column name after the table name.
- Login into the MySQL server using the below command.
mysql -u root -pNote:- In my case,The name root representing the user of database that I want to use for login into MySQL server, It might be different in your case.
- Switch into the required database using the use command. I am switching to the database called testing.
use testingNote:- The use command is used to switch into the database which we want to use.In my case, testing represents the name of the database.
- Now you can use DESCRIBE command to display all the columns of the table. Here I am going to display all the columns of the table called an employee of the database testing.
- Display all the column’s information:
mysql> DESCRIBE employee;
+--------------+---------------+------+-----+---------+----------------+
| Field        | Type          | Null | Key | Default | Extra          |
+--------------+---------------+------+-----+---------+----------------+
| id           | int           | NO   | PRI | NULL    | auto_increment |
| emp_id       | varchar(20)   | YES  |     | NULL    |                |
| first_name   | varchar(50)   | YES  |     | NULL    |                |
| last_name    | varchar(50)   | YES  |     | NULL    |                |
| email        | varchar(100)  | YES  |     | NULL    |                |
| gender       | varchar(10)   | YES  |     | NULL    |                |
| age          | int           | YES  |     | NULL    |                |
| salary       | decimal(20,2) | YES  |     | NULL    |                |
| designation  | varchar(100)  | YES  |     | NULL    |                |
| department   | varchar(100)  | YES  |     | NULL    |                |
| joining_date | date          | YES  |     | NULL    |                |
+--------------+---------------+------+-----+---------+----------------+
11 rows in set (0.20 sec)
- Display single-column information:
mysql> DESCRIBE employee first_name;
+------------+-------------+------+-----+---------+-------+
| Field      | Type        | Null | Key | Default | Extra |
+------------+-------------+------+-----+---------+-------+
| first_name | varchar(50) | YES  |     | NULL    |       |
+------------+-------------+------+-----+---------+-------+
1 row in set (0.10 sec)
Note:- Instead of using DESCRIBE command, you can use the DESC statement because it is the shorthand of DESCRIBE statement.
For example, the above statement DESCRIBE employee first_name is the same as DESC employee first_name.
mysql> DESC employee first_name;
+------------+-------------+------+-----+---------+-------+
| Field      | Type        | Null | Key | Default | Extra |
+------------+-------------+------+-----+---------+-------+
| first_name | varchar(50) | YES  |     | NULL    |       |
+------------+-------------+------+-----+---------+-------+
1 row in set (0.00 sec)
👉 DESCRIBE Documentation:- Click here
Using EXPLAIN Command
The other statement is EXPLAIN which synonym for DESCRIBE statement. The only difference between these is, DESCRIBE command show only column information whereas EXPLAIN command is used to find the query execution plan.
EXPLAIN command is work with select, update, insert, delete, and replace statements. In MySQL 8.0.19 or later it works with table statements also.
It can display the information in table, tree, and JSON format. By default, it returns output in tabular ( table ) format ) but we can change it by using the FORMAT option. Let’s see how can we use EXPLAIN command in different-different ways.
Display all the columns
To display all the columns, pass only the table name.
EXPLAIN employee;Display only one column
To display information about only a single column, you have to pass the column name along with the table as you can see, here I am going to see information about the first_name column.
EXPLAIN employee first_name;Display column information in JSON
To show the information in JSON format you need to pass FORMAT=JSON. This time I will try to obtain the information about the SELECT statement.
EXPLAIN format=json SELECT first_name FROM employee;After executing the about command, your output will be like this.
{
  "query_block": {
    "select_id": 1,
    "cost_info": {
      "query_cost": "1.85"
    },
    "table": {
      "table_name": "employee",
      "access_type": "ALL",
      "rows_examined_per_scan": 16,
      "rows_produced_per_join": 16,
      "filtered": "100.00",
      "cost_info": {
        "read_cost": "0.25",
        "eval_cost": "1.60",
        "prefix_cost": "1.85",
        "data_read_per_join": "27K"
      },
      "used_columns": [
        "first_name"
      ]
    }
  }
}
👉 EXPLAIN Documentation:- Click here
Using SHOW COLUMNS Statement
SHOW COLUMNS statement is also used to display information about the columns of a given table. It also works for views. SHOW COLUMNS statement displays information about only those columns for which you have some privileges.
Syntax:
SHOW [EXTENDED] [FULL] {COLUMNS | FIELDS}
    {FROM | IN} tbl_name
    [{FROM | IN} db_name]
    [LIKE 'pattern' | WHERE expr]
Let’s discuss the above syntax:
- EXTENDED is an Optional keyword that is sued to show the hidden columns because MySQL hides the hidden columns by default.
- FULL is also an option that is used to show the full information about columns like collation, comment, and privileges that column have.
- table_name indicates the name of the table name.
- db_name indicates the name of the database which stores the table_name.
- LIKE or WHERE is used to select only those columns that full fill the specified pattern.
Now, let’s use the SHOW COLUMNS statement to show all the columns of the student table.
SHOW COLUMNS FROM student;Output
+------------+-------------+------+-----+---------+----------------+
| Field      | Type        | Null | Key | Default | Extra          |
+------------+-------------+------+-----+---------+----------------+
| roll_no    | int         | NO   | PRI | NULL    | auto_increment |
| first_name | varchar(50) | YES  |     | NULL    |                |
| last_name  | varchar(50) | YES  |     | NULL    |                |
+------------+-------------+------+-----+---------+----------------+
3 rows in set (0.00 sec)
In the above show column statement, the student represents the name of the table. You can also use these statements instead of using above statements.
SHOW COLUMNS FROM testing.student;
SHOW COLUMNS FROM student FROM testing;
Here testing represents the name of the database and the student represents the name of the table.
The Optional FULL keyword is responsible for displaying some additional information in the database table column like collation, comment, and each column’s privileges.
SHOW FULL COLUMNS FROM student FROM testing;Output
+------------+-------------+--------------------+------+-----+----------------------+----------------+---------------------------------+---------+
| Field      | Type        | Collation          | Null | Key | Default              | Extra          | Privileges                      | Comment |
+------------+-------------+--------------------+------+-----+----------------------+----------------+---------------------------------+---------+
| roll_no    | int         | NULL               | NO   | PRI | NULL                 | auto_increment | select,insert,update,references |         |
| first_name | varchar(50) | utf8mb4_0900_ai_ci | YES  |     | NULL                 |                | select,insert,update,references |         |
| age        | int         | NULL               | YES  |     | NULL                 |                | select,insert,update,references |         |
| last_name  | varchar(50) | utf8mb4_0900_ai_ci | YES  |     | NULL                 |                | select,insert,update,references |         |
| college    | varchar(50) | utf8mb4_0900_ai_ci | YES  |     | ABC Group of College |                | select,insert,update,references |         |
| city       | varchar(45) | utf8mb4_0900_ai_ci | YES  |     | NULL                 |                | select,insert,update,references |         |
+------------+-------------+--------------------+------+-----+----------------------+----------------+---------------------------------+---------+
6 rows in set (0.00 sec)
So, this is how you can use the SHOW COLUMNS statement to Show Columns of a Table in MySQL. Now let’s move on to another one.
👉 SHOW COLUMNS Documentation:- Click here
Using mysqlshow Command
The mysqlshow command is a command line tool that comes with MySQL by default. Basically, it is used to check which databases exist, and their tables or columns of the table and indexes as well.
Syntax
mysqlshow [options] [db_name [tbl_name [col_name]]]You have to remember some points about mysqlshow command.
- If no database name is given, Then it will display all the database names.
- If no table name is given, Then it will display matching tables of the given database.
- If no column name is given, Then it will display all the columns of matching table names.
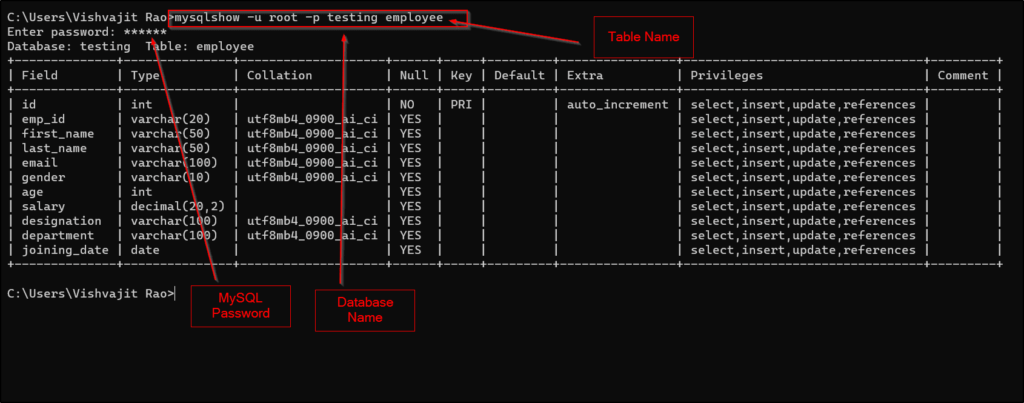
To use of mysqlshow command, you don’t need to login into the MySQL server beforehand, because mysqlshow is a command line tool that’s why it will not execute inside the MySQL shell.
mysqlshow -u root -p testing employeeIn the above statement, -u represents the name of the user by which we are logging in, testing represents the name of the database and the employee indicates the table, and -p will prompt us to type a password for the user root. As you can see below screenshot.
👉mysqlshow Command Docs:- Click Here
Using INFORMATION_SCHEMA View
In relational Databases ( MySQL, SQL Server, etc ), INFORNATION_SCHEMA is a database that comes with default. It is a collection of read-only views. It is used to retrieve the metadata about databases like the name of the database, the name of the table, the columns of the table, access privileges, and other more information that is sometimes required to be used.
Now let’s see how can we use the INFORNATION_SCHEMA database to fetch all the information about the column names of a table.
Please follow the following steps:
- Login into MySQL.
mysql -u root -p- Switch into the database.
use information_schema- Use select statement to get all the column names of the table employee. Same as follows.
mysql> SELECT COLUMN_NAME, DATA_TYPE FROM COLUMNS WHERE TABLE_NAME = 'employee';
+--------------+-----------+
| COLUMN_NAME  | DATA_TYPE |
+--------------+-----------+
| age          | int       |
| department   | varchar   |
| designation  | varchar   |
| email        | varchar   |
| emp_id       | varchar   |
| first_name   | varchar   |
| gender       | varchar   |
| id           | int       |
| joining_date | date      |
| last_name    | varchar   |
| salary       | decimal   |
+--------------+-----------+
11 rows in set (0.00 sec)
So, this is how we can use the INFORMATION_SCHEMA database to fetch all the columns’ names of the table.
👉INFORMATION_SCHEMA Docs:- Click Here
Summary
So, have you seen, how we have covered various ways to Show Columns of a Table in MySQL table. These all commands or statements are
very useful when you are using MySQL database in your real-life projects. You can pick any one of them as per your requirement.
I would like to recommend you, for getting more information about the command that we have done throughout this article, please visit their official documentation and explore more about those corresponding commands.
Please visit for more interesting MySQL tutorials.
Thanks for your valuable time ….
have a nice day… ❤️❤️🙏🙏